Sunday, August 23, 2020

Guide for replacing Nintendo Switch Joy-Con Battery

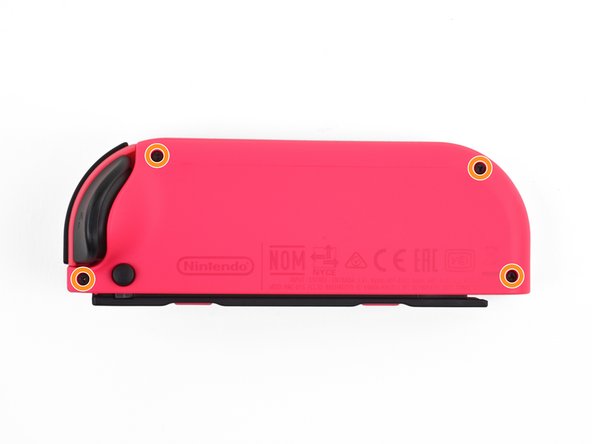
Remove the four Tri-Point Y00 screws from the back panel of the Joy-Con.

Guide for replacing Nintendo Switch Joy-Con Battery 3Bvx41PUKLSvBBWd

Insert an opening pick into the seam at the bottom edge of the controller (opposite the L and ZL buttons).
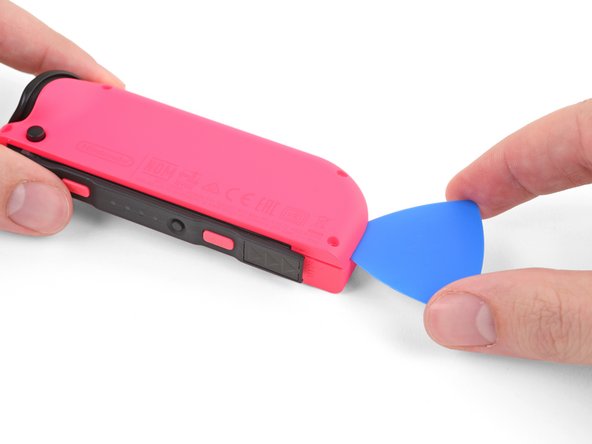
Guide for replacing Nintendo Switch Joy-Con Battery JeFnTOukwhPVEJc5

Slowly slide the flat edge of your opening pick up the side of the Joy-Con.
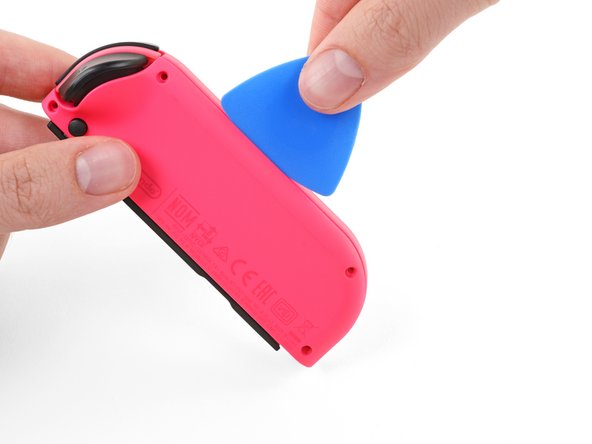
Guide for replacing Nintendo Switch Joy-Con Battery JWNd3b5g6FTqCsZC

With the charging rail facing away from you, open the the Joy-Con like a book.
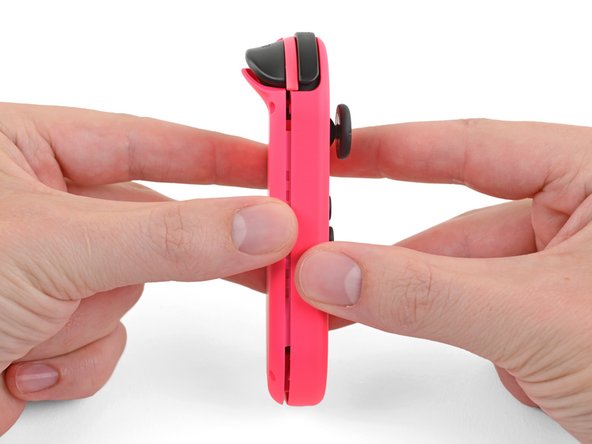
Guide for replacing Nintendo Switch Joy-Con Battery Mmee2RMhPHOpquMA

Don't try to fully remove the back panel yet. There are still two cables connecting the charging rail to the motherboard.
Guide for replacing Nintendo Switch Joy-Con Battery ACVGtmScSy5LndpA

Use a spudger to gently pry the battery connector straight up from its socket on the motherboard. This will keep the Joy-Con from powering on during the repair.
Guide for replacing Nintendo Switch Joy-Con Battery BOFJfsG3ZfMYEWRn

Insert an opening pick between the battery and the Joy-Con housing.
Guide for replacing Nintendo Switch Joy-Con Battery 6cTHHygYU6cOTdCa

Gently pry out the battery, which is lightly taped in place.
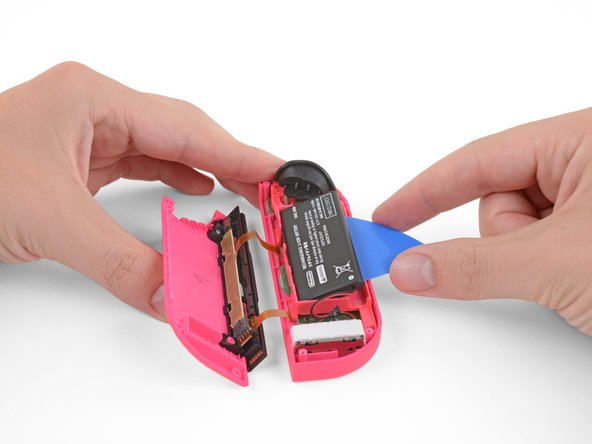
Guide for replacing Nintendo Switch Joy-Con Battery OSwESqQBxCK6DaET

Be careful not to deform or puncture the battery―it can catch fire or explode if damaged.
Guide for replacing Nintendo Switch Joy-Con Battery 3oaAkL6JKc161WPO

Install the new battery
Guide for replacing Nintendo Switch Joy-Con Battery 0?e=1600905600&v=beta&t=T4u_h981mvmKneKtnK1XadsDGHvDm0HmqOWliNMQ1G8

Follow us on Wechat to see more battery repair guides.
Guide for replacing Nintendo Switch Joy-Con Battery 0?e=1600905600&v=beta&t=1Bd7xRBjTq-5ntlrYMMaq3z7ZgPbhdrLnDUmvgyJu8s

How to replace Technics EAH-AZ70 battery

The procedure of replacing battery for Technics EAH-AZ70 is same as that of Panasonic RZ-S50W

How to replace Technics EAH-AZ70 battery 0?e=1600905600&v=beta&t=0LzVW5mbc9PKlM7WP90HPV8-djOrFMQC4A87onHHA_k

The first step is to cut the earphone off
How to replace Technics EAH-AZ70 battery 0?e=1600905600&v=beta&t=vLXZmG8JhIdV8oFHuB_po1hCYzhyme8pi6tOBlqJ_Kw

Then remove the mainboard of earphone
How to replace Technics EAH-AZ70 battery 0?e=1600905600&v=beta&t=G62zDSEenmA6YcDkk7GySg0GrAEdzu82DNWa0IBDI64

De-soldering the old battery
How to replace Technics EAH-AZ70 battery 0?e=1600905600&v=beta&t=ik9HOAOvDcWMXF_Xmc3qV_tgRaPblRFRa4JTRtjxXX0

Soldering the new battery
How to replace Technics EAH-AZ70 battery 0?e=1600905600&v=beta&t=Gj4g3rdxIaU2pAsBGFC5uxSvSCnRwI2qRDVpaIhjfGg

Follow us on Wechat to see more battery repair guides.
How to replace Technics EAH-AZ70 battery 0?e=1600905600&v=beta&t=1Bd7xRBjTq-5ntlrYMMaq3z7ZgPbhdrLnDUmvgyJu8s

How to replace Panasonic RZ-S500W True Wireless Earphone Battery

The battery replacement of Panasonic RZ-S500W True Wireless Earphone may destruct earphone's appearance. Anyway here is the guide on how to replace its internal battery.

How to replace Panasonic RZ-S500W True Wireless Earphone Battery 0?e=1600905600&v=beta&t=NlD_SDJ6H7PHOUEWhGduSItn1tqWw0bJsS_wKeZ6gos

The first step to replace the battery is to cut the earphone off.
How to replace Panasonic RZ-S500W True Wireless Earphone Battery 0?e=1600905600&v=beta&t=4jRxHh9XT7bgwl11H3yrpNt8FAjef6LV3i_CiTIuO38

Open the earphone back cover and reveal the battery
How to replace Panasonic RZ-S500W True Wireless Earphone Battery 0?e=1600905600&v=beta&t=5Zv0D_9HLKSkxo4Ag6jSEy_a7R02m2jASzRZv2sVfHU

Pull the battery off from the housing
How to replace Panasonic RZ-S500W True Wireless Earphone Battery 0?e=1600905600&v=beta&t=UekR4D5iLH5AMK6RcR_abXrBjdyDbewUFJcdewU62ho

Desoldering the battery from earphone's mainboard
How to replace Panasonic RZ-S500W True Wireless Earphone Battery 0?e=1600905600&v=beta&t=uF_S_q9WTGjVzMPD0k8vKgqvlg_6JbZRU6Gl45-v3I8

Soldering the new battery
How to replace Panasonic RZ-S500W True Wireless Earphone Battery 0?e=1600905600&v=beta&t=Gj4g3rdxIaU2pAsBGFC5uxSvSCnRwI2qRDVpaIhjfGg

Follow us on Wechat to see more battery repair guides.
How to replace Panasonic RZ-S500W True Wireless Earphone Battery 0?e=1600905600&v=beta&t=1Bd7xRBjTq-5ntlrYMMaq3z7ZgPbhdrLnDUmvgyJu8s

Samsung Galaxy Watch's teardown and Battery Replacement


Samsung Galaxy Watch was initially named as Gear S4 and introduced on August 2018. It has different version in different countries. The global version's models are SM-R805F, SM-R805N, SM-R815F and SM-R815N,while in USA and Canada its models are SM-805U, SM-805W, SM-815U, SM-815W. China has a special model number SM-R8050.
Samsung Galaxy Watch's teardown and  Battery Replacement 0?e=1600905600&v=beta&t=FFQSZDMIcOpMSsG_1YErqAckKG8r4yYCIR3dwLw7NCA

In below we'll introduce how to change its internal battery in details:

Firstly remove four screws on the back of watch as below picture.
Samsung Galaxy Watch's teardown and  Battery Replacement 0?e=1600905600&v=beta&t=FFQSZDMIcOpMSsG_1YErqAckKG8r4yYCIR3dwLw7NCA

Use plastic pick to pry the watch's back cover.
Samsung Galaxy Watch's teardown and  Battery Replacement 0?e=1600905600&v=beta&t=bAmwoNqbLHE1O2fvGmmSZZF2Q23DJpD_TqI2EhZG7pw

Remove sensor cable
Samsung Galaxy Watch's teardown and  Battery Replacement 0?e=1600905600&v=beta&t=NmWAGREVrnxPDzRh6DqHpQCOgL-FLdZLCo4JWwzBMHQ
Samsung Galaxy Watch's teardown and  Battery Replacement 0?e=1600905600&v=beta&t=EjAxNf91g7Hfbms31yKjkK_3iPCxm39Kpw3jAVMm5ck

Remove back cover
Samsung Galaxy Watch's teardown and  Battery Replacement 0?e=1600905600&v=beta&t=fK1a0urYAqyl4YVDsu96SWi3FoMhUszns8u30vqp1cE

Remove display cable
Samsung Galaxy Watch's teardown and  Battery Replacement 0?e=1600905600&v=beta&t=z3CuGpWfPWM-SjHXMx5sQ01JB8XNLJ0JoSRh9rGNugw

Take the core parts out
Samsung Galaxy Watch's teardown and  Battery Replacement 0?e=1600905600&v=beta&t=6RhFKfIw8FvwH4LxGjyF-W39vNwoq2BfNBQt6W8vfF0

Remove sensor cable
Samsung Galaxy Watch's teardown and  Battery Replacement 0?e=1600905600&v=beta&t=LhEbQUN-tbQEuVC3_dYwCobinhb8bL9rLxqRxvPKdJ0

Remove button cable
Samsung Galaxy Watch's teardown and  Battery Replacement 0?e=1600905600&v=beta&t=Y9kr7vGr-I9HtSjgW6Ve4cAYqcGNOiIX-WufDqzimTQ

Remove screw
Samsung Galaxy Watch's teardown and  Battery Replacement 0?e=1600905600&v=beta&t=6-wq6tYdG-rAuAHK4GDGW-AaXh0iXqANaxzBdO6GcXE

Pry the mainboard
Samsung Galaxy Watch's teardown and  Battery Replacement 0?e=1600905600&v=beta&t=SDCSHKETDsxK69GHrfHiuJWzX-4Zpnq-8hwx8gW6daM

Take the mainboard out
Samsung Galaxy Watch's teardown and  Battery Replacement 0?e=1600905600&v=beta&t=0CSXKNiLvsLOu8bnad9X1ynihUpWDuiZJCVOdOGSLbc

Remove the old battery
Samsung Galaxy Watch's teardown and  Battery Replacement 0?e=1600905600&v=beta&t=HJwL7P1JFbam3palYpt9wWhUwJ2sv7rsTKLvwcIrCvk

Replace new battery
Samsung Galaxy Watch's teardown and  Battery Replacement 0?e=1600905600&v=beta&t=mScAujTKVnhCrCBmzWhL_vh_akUQRVscdAwiE37Bwno

Follow us on Wechat to see more battery repair guides.
Samsung Galaxy Watch's teardown and  Battery Replacement 0?e=1600905600&v=beta&t=1Bd7xRBjTq-5ntlrYMMaq3z7ZgPbhdrLnDUmvgyJu8s

Friday, August 21, 2020

Teardown of Samsung Galaxy Watch 3 down and instruction of replacing its battery

Samsung Galaxy Watch 3 just joined Samsung's wearable family. It uses an internal li-polymer battery. Here is the instruction on how to replace its battery

The first step is to remove screws on the back of Galaxy Watch 3.
Teardown of Samsung Galaxy Watch 3 down and instruction of replacing its battery 0?e=1600905600&v=beta&t=t_TCRxT7fnL4qtkE-_pV_g9rxb2ua3Xpf5LCLx3ixVA

The second step: remove watch back cover
Teardown of Samsung Galaxy Watch 3 down and instruction of replacing its battery 0?e=1600905600&v=beta&t=-YLsFVwjfqpYv3lOey8MmwNQ2PdopP3Humv_Q3Hmdqs

The third step: remove watch's mainboard
Teardown of Samsung Galaxy Watch 3 down and instruction of replacing its battery 0?e=1600905600&v=beta&t=MkL-0bR4m5pRA473OSe9pXmi_fHf9NCmtpR-yQlvTEU

The fourth step: After removal of watch mainboard the battery will revealed
Teardown of Samsung Galaxy Watch 3 down and instruction of replacing its battery 0?e=1600905600&v=beta&t=t6qri3zuRLHzFrF6_8p9irXY3-McT228dQ2Wt2qLpsc

The fifth step: use plastic picks to pry battery off and install new battery
Teardown of Samsung Galaxy Watch 3 down and instruction of replacing its battery 0?e=1600905600&v=beta&t=KFAg7IzZtViC9Mbp2PcggVEzvPtaD6eaw9rtvgY-_1g

battery code:EB-BR840ABY 3.85V 330mAh
Teardown of Samsung Galaxy Watch 3 down and instruction of replacing its battery 0?e=1600905600&v=beta&t=h0oekxAwEHe27SOypu6RSrmDumxJxPwjgu36JHklPu8

Follow us on Wechat
Teardown of Samsung Galaxy Watch 3 down and instruction of replacing its battery 0?e=1600905600&v=beta&t=GwmYmxIzU6mhqqSha_ISP-LXradyhnKaZaFZWUsCVlQ

Thursday, August 20, 2020

Shark Ion RV700 RV750 Vacuum Cleaner Battery RVBAT700


Part Number:PT-SH700
Type: Li-Ion
Voltage: 14.8V
Capacity: 2800mAh
Replace Code: RVBAT700,RVBAT850
Compatible with Shark Ion RV750, RV755, RV720, RV725, RV850, RV750_N
Shark Ion RV850 Vacuum Cleaner RVBAT850 0?e=1603324800&v=beta&t=ZhMxNF47uGD0L0xliqYfiCJbtOsFd3BfA2aC5_jiMj4

Shark Ion RV850 Vacuum Cleaner RVBAT850

Part Number:PT-SH700
Type: Li-Ion
Voltage: 14.8V
Capacity: 2800mAh
Replace Code: RVBAT700,RVBAT850
Compatible with Shark Ion RV750, RV755, RV720, RV725, RV850, RV750_N
Shark Ion RV850 Vacuum Cleaner RVBAT850 0?e=1603324800&v=beta&t=ZhMxNF47uGD0L0xliqYfiCJbtOsFd3BfA2aC5_jiMj4

Wednesday, August 19, 2020

Sony Smartwatch 2 battery AHB412033PS

Part Number: WL-SW2
Type: Li-Polymer
Voltage: 3.7V
Capacity: 150mAh
Replace Code: AHB412033PS
Compatible with Smartwatch 2,SW2, RD-0050
Sony Smartwatch 2 battery AHB412033PS 0?e=1603324800&v=beta&t=NjosQyKnu81hZdnrN4i6QKl6XFpDWfCZgEtRuQNYuNs

Monday, August 17, 2020

Fitbit Versa FB504 smartwatch SP271828SF

Part Number:WL-FBT10
Type: Li-Polymer
Voltage: 3.7V
Capacity: 150mAh
Replace Code: SP271828SF
Compatible with Fitbit Versa, FB504, FB505
Fitbit Versa FB504 Smartwatch battery SP271828SF 0?e=1600300800&v=beta&t=w11pB5C6lV24-mXS6vlvVUkEVsFzuscN4DfoUt7XlXs

TomTom Bridge Terminal GPS Battery 1CP515161HR UZ6

Part Number:PA-TMUZ6
Type: Li-Polymer
Voltage: 3.7V
Capacity: 2100mAh
Replace Code: 1CP515161HR,UZ6
Compatible with TomTom Bridge Terminal, Bridge Terminal Connected, BridgeTerminal Connected Premium

Monday, March 30, 2020